
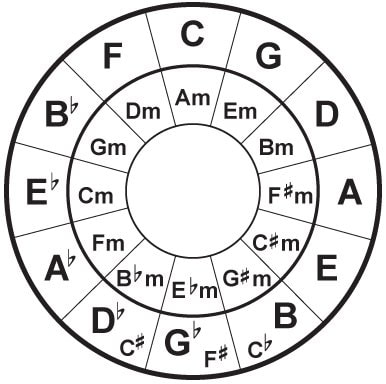
 The circle of fifths has many applications. First off, I have my students write it out: 1. draw a circle of a piece of paper 2. beginning at 12 o'clock, write C, then progressing clockwise, you count up a 5th from 1 o'clock through 6 o'clock: C – G – D – A – E – B – F#. The right hemisphere of the circle deals in sharps and the left in flats.
To complete the left hemisphere, begin at 12 o' clock ( C ) and now proceed counter-clockwise in 4ths ( 4ths and 5ths are reciprocally inverse ) this produces: F – Bflat – Eflat – Aflat – Eflat – Dflat – Gflat. I suggest students write this out everyday for a week or two by then you'll have a good handle on it. A rudimentary use for the circle of fifths is to identify the accidentals in keys, here's how: G is at 1 o'clock and has one sharp, D is at 2 o'clock and has two sharps and so on ( A = 3 sharps, E = 4 sharps, B =5 sharps, F# = 6 sharps ) In other words, the numbers of sharps on the right hemisphere of the circle corresponds to the position on the numbers on the clock that are replaced by letters. The left hemisphere deals in flats, to find them, proceed counter-clockwise from C ( 12 o'clock ) progressively adding one flat with each successive step on the clock. Ex. 11 o'clock = one flat, 10 o'clock = 2 flats, 9 o'clock = 3 flats and so on. The exciting moment you've all been waiting for - yes, the 2nd part of Thinking Tonally...! (Start here if you missed part 1)
Now, let's get right to the exercises: Play your low E string and let it ring, then play an E major scale starting on the D string. What this exercise is doing is it's beginning to train your ear to become familiar with the essence of the major tonality. Then do the same with the other three tonalities. (E minor, major blues and minor blues) The next exercise is very similar but instead of the open E note as the comparison to the scales you will play chords to compare to the scales: An E major chord against the E major scale, E minor chord against the E minor scale, E7 chord against the E major blues and the E minor blues. This will train your ear to hear the reflections of the scales in the chords and vice versa. In the last exercise, we'll use the high E and B strings to create double stops ( two notes at once ) that define the four tonalities. We're going to harmonize the four scales in 3rds, that means you'll play the root and 3rd (or flat 3rd for a minor chord ) together. Begin with the E on the B string, fret 5 and the G# on the E string, fret 4. ( E to G# is a 3rd ) Then you simply ascend within the E major scale one step at a time on both strings simultaneously, then repeat the same process with the other three scales. Once you do this exercise you'll have a much better understanding of the defining characteristics of the tonalities.  This is a very useful concept I teach to all my students, it really helps to define and classify the fundamental tonalities I teach intermediate beginners, which are: major, minor, major blues and minor blues.
“Tonalites” have characteristic sounds which are created by specific intervals. As a musician, you need to develop the capacity to identify these four tonalities. (and later, others) We'll begin by basing each tonality on a corresponding scale, which respectively are: major, minor, major blues and minor blues scales. Major scales are the only scales with no intervallic alterations, it's formula is simply: 1 – 2 – 3 – 4 – 5 – 6 – 7. C major scale = C – D – E – F – G – A – B. The minor scale formula is: 1 – 2 – flat3 – 4 – 5 – flat6 – flat7. C minor scale = C – D – Eflat – F – G – Aflat – Bflat. The major blues scale formula is: 1 – 2 - flat3 – 3 – 5 – 6. C major blues scale = C – D – Eflat – E – G – A. And the minor blues scale formula is: 1 – flat3 – 4 – flat5 – 5 – flat7. C minor blues scale = C – Eflat – F – Gflat – G – Bflat. What I'm about to say is quite abstract but as you practice and study it will slowly begin to make more and more sense: when you play the major scale and chord progressions beginning on the I chord in the same key, each is tonally reflected in the other. Ex) A C major scale evokes the overall tonality of playing a I – IV – V progression in the key of C and the same is true of the relationship between the other three scales and the progressions you'll play them over. In the next blog I'll give very concrete exercises to play that will help clarify these concepts... 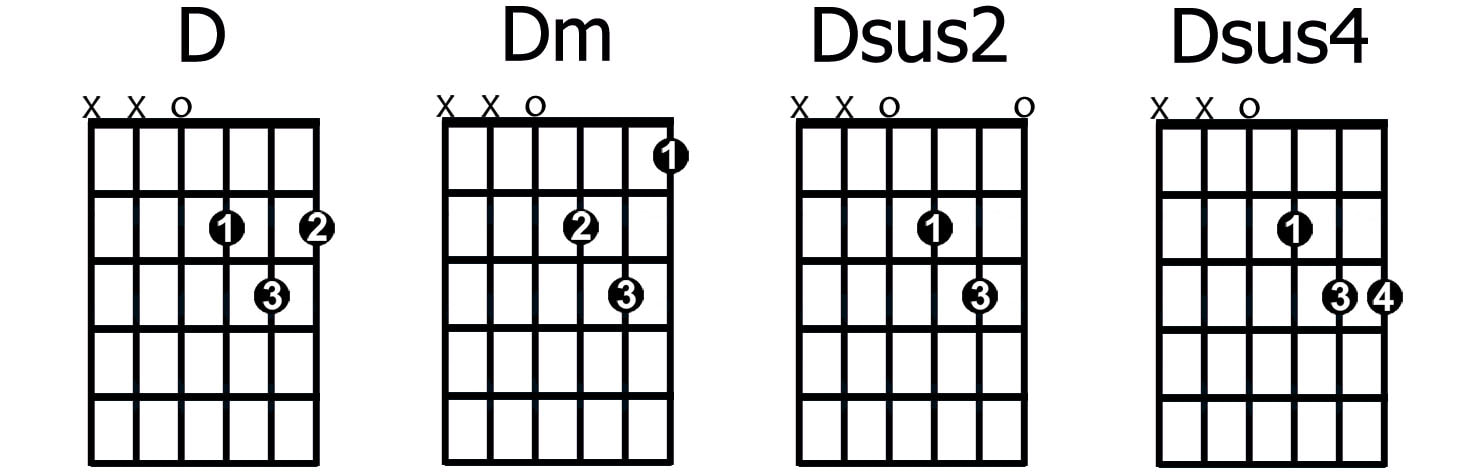 Often when you hear a guitar player strumming some chords and you notice some motion going on within the chord that sounds nice and interesting – frequently, what they're playing are called “suspended chords” (or sus chords) Suspensions or suspended chords come in two varities – sus4 chords and sus2 chords. A suspended chord substitutes either the 4th or the 2nd in place of the 3rd. Ex) Csus4 = C – F – G and Csus2 = C – D – G. If you're playing a sus4 chords, most musicians just call that it a sus chord (the sus4 is a given) and if you're playing a sus2 chord, you need to call it as such. An aspect of sus chords many musicians aren't aware of is the fact that you can suspend many chords, not just major. Here are some examples: C7sus = C – F – G – Bflat, C6sus = C – F – G – A, C9sus = C – F – G – Bflat – D, C7sus2 = C – D – G – Bflat. I suggest that you take every major and dominant chord you know and practice making them into both sus and sus2 chords. Also, remember you can often do two versions of each suspension by placing the 4ths and 2nds into different octaves. Generally, suspensions are useful whenever you're playing a chord for some length of time. Also, suspensions are frequently played withing single note, arpeggiated chords. A famous example is in the intro of the Boston song “More than a Feeling”.  Ninja PickIf you've ever been to the Guitar Center or shopped online for guitar picks you've likely experienced a healthy dose of overwhelm in the face of seemingly unending options! Picks come in numerous sizes, shapes, thicknesses, textures and are made out of many different materials.
Picking is like any other physical motion involved in playing the guitar in that to optimize results it must be done with as much “economy of motion” as possible. (moving as little as possible to maximize efficiency) Achieving this on the guitar requires both economy of motion and making contact with the strings with the very tip of the pick. If, for example, you have a half inch of pick exposed out beyond your fingers and you strike the string a quarter of an inch beyond the tip, this will dramatically slow down your picking because you have to drag your pick that additional distance. The way this relates to my recommendation for beginners in choosing a pick is as follows: If you use a very small pick (teardrop pick) there can only be a tiny bit of pick exposed beyond your fingers which slashes your margin of error – this is the main reason I suggest beginners should use small picks. It is possible, and many players do this, to have more pick exposed and still only make contact with the tip of the pick and be equally efficient as someone using a small pick. Beyond that consideration, the main points to think about when choosing a pick are the comfort of the pick in your hands and the different tones that different picks make on different strings on different guitars. Not surprisingly, with that many variables, this process requires a lot of trial and error. I recommend you buy a large variety of different picks and compare them to each other on the same guitar. |
AuthorEric Hankinson Archives
December 2023
Categories
All
|
 RSS Feed
|
The Chromatic Watch Company
(my other business)  |
|

 |